Field Care
At Judkins Custom Taxidermy, we believe that proper field care is essential to preserving the quality of your trophy. Here are some tips to help you take care of your game in the field:
Exceptional Taxidermy Starts in the Field
Make sure you take good care of your game and preserve the memory of the hunt with a stunning trophy. See below for some standard field care tips and information from taxidermists to help you preserve your game. Work with a master taxidermist who pays great attention to detail. Contact us today for your FREE consultation for your prized trophy!
General Information
Keep your trophy as cool as possible. Avoid keeping it in the sun or laying it on top of hot vehicles. Excess heat promotes bacterial growth, which results in hair slippage. The cooler it's kept and the sooner it's frozen, the better.
The skinning should be left for your taxidermist. DO NOT gut the animal. Small mammals will spoil quickly. If you can't take the small game animal immediately to a taxidermist, as soon as the carcass cools completely, put it in a plastic bag and freeze.
By following these simple steps, you can help ensure that your trophy is in the best possible condition when it arrives at our studio.
Field Dressing
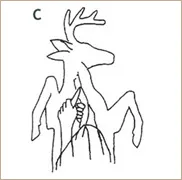
- With the deer on its back, make a shallow cut through the skin just below the breastbone. Make sure that you start your cut well away from the brisket allowing plenty of uncut skin for shoulder mount. Insert two fingers of the free hand, cradling the blade, to hold the skin up and away from the entrails.
- Cut straight down the belly and around the genitals, separating but not severing them from the abdominal wall. Slit the belly skin all the way to the pelvic bone.
- Cut deeply around the rectum, being careful not to cut off or puncture the intestine. Pull to make sure the rectum is separated from the tissue connecting it to the pelvic canal. Pull the rectum out and tie a string tightly around it to prevent droppings from touching the meat. Lift the animal's back quarter a bit, reach into the front of the pelvic canal, and pull the intestine and connected rectum into the stomach area.
- If you want to make a full shoulder mount, do not cut open the chest cavity. Cut the diaphragm away from the ribs all the way to the backbone area. Reach into the forward chest cavity, find the esophagus and windpipe, cut them off as far up as possible, and pull them down through the chest.
- Roll the deer onto its side; grab the esophagus with one hand and the rectum/intestine with the other. Pull hard. The deer's internal organs will come out in one big package with minimum mess.
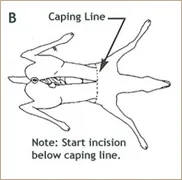
Caping
Caping should be left for the experienced taxidermist. Properly skinning the delicate nose, mouth, eyes and ears is invaluable toward producing a quality mount. Master taxidermists can repair damages usually at a cost, but some damages cannot be fixed.
We recommend contacting us before the hunt to discuss caping requirements or any questions you might have. If this is not possible, the below two methods of skinning would be the most acceptable.
Flat Incision - This method is generally used for rug mounts and other poses. Make the slits and pull the skin off of the carcass. The head is detached. If you cannot bring in the hide right away, please make sure you freeze it until you are able to bring it to the taxidermist.
Dorsal Method - This method of removing skin from the carcass involves a long slit down the back. The feet or hooves and the head are cut off from the carcass as with shoulder mounts explained later. Only use this method with approval and detailed instruction from your taxidermist. You must be able to freeze the hide quickly after skinning with this method as well.
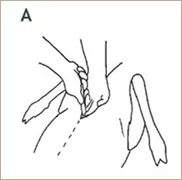
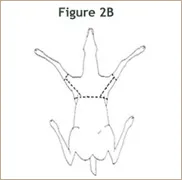
Caping for a Shoulder Mount
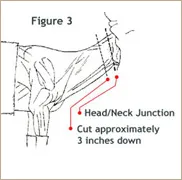
- With a sharp knife, slit the hide circling the body behind the shoulder at approximately the midway point of the rib cage behind the front legs. Slit the skin around the legs just above the knees. An additional slit will be needed from the back of the leg and joining the body cut behind the legs.
- Peel the skin forward up to the ears and jaw exposing the head/neck junction. Cut into the neck approximately three inches down from this junction. Circle the neck cutting down to the spinal column. After this cut is complete, grasp the antler bases and twist the head and remove from the neck. This should allow the hide to be rolled up and put in a freezer until delivered to a taxidermist. These cuts should allow plenty of hide for the taxidermist to work with in mounting. Remember, the taxidermist can cut off excess hide, but he can't add what he doesn't have.

Small Game
The skinning should be left for your taxidermist. DO NOT gut the animal. Small mammals will spoil quickly. If you can't take the small game animal immediately to a taxidermist, as soon as the carcass cools completely, put it in a plastic bag and freeze.
If you have any questions about field care or our taxidermy services, please don't hesitate to contact us.